
Fancy Advent Calendar Tutorial
I’ve always been that person that gets way more excited for the holidays than most and longingly waits for it to be socially acceptable to listen to the Bing Crosby Christmas station all day and watch all the Christmas movies...twice. But this year's excitement level has hit an all-time high, now that I have a rambunctious toddler to share it with. This is the year it will all be so much more magical for her. And now that Halloween is done, I’m over here doing a little happy dance that I get to start planning all the magic and memories. I’ve always loved the idea of an Advent Calendar, but my daughter has been too young to understand the concept, until now. So, this year I got started early and can’t wait to show you what I came up with.

I wanted something that would be practical, cute, eclectic and long-lasting. I didn’t want it to look store-bought or to be in the shape of a tree, which so many very adorable and cute Advent Calendars are, but it wasn’t what I was going for. I knew I wanted to hand stitch a lot of the numbers myself, as I absolutely love hand work. There is something so satisfying about stitching with your hands. I’m 100% sure I get it from my great-grandmother who lovingly hand stitched beautiful quilts for many years. It’s just something that feels so right to me. If you haven’t tried it yet, this is a wonderful first dive into hand embroidery because it’s just one simple number at a time.

Materials
3-4 fat quarters for colorful pockets (will vary depending on how many prints you want)
¼ yard Essex Yarn Dyed Metallic in Oyster
1 ⅔ yards Essex Yarn Dyed Homespun in Natural for pockets and background
⅔ yards Cotton Canvas for backing
¼ yard cuts of a variety of ribbons and trims
Felt pieces in Red and Green
Embroidery floss in Red, Green and Ivory or white
Water-soluble pen
Embroidery Transfer pen
Hand Sewing needle with large eye
4” Embroidery hoop
*Note: This project is a great opportunity to dive into your stash for something cute to fussy cut for one of the colorful pockets.

Cutting
(All measurements are height x width)
Note: I found it helpful to determine how many squares of each fabric I needed by gluing bits of scrap fabric onto paper. This helped me make sure I wasn’t going to have two prints right next to each other or that I wasn’t using too much of one fabric. I wanted mine to have more natural pockets than colorful pockets, but do what feels right for you. Below is what I cut.
From background fabric -
(1) 20” x 30” for background
(1) 4” x 30” for dowel or yardstick pocket
(3) 6 ½” x 29” for pocket backing
(11) 6 ½” x 6 ½” for pockets
From cotton canvas -
(1) 20” x 30” for backing
From colorful fat quarters -
(2) 6 ½” x 6 ½” in each print for pockets. One square I cut at 7” x 7” for the last pocket.
From Metallic fabric -
(5) 6 ½” x 6 ½” for pockets
*Optional Decorative pockets -
I chose to use these adorable sweaters from Cotton & Steel. If you choose not to have a pocket like this, you can cut two additional squares of a colorful print or a background fabric
(2) 6 ½” x 6 ½” for pockets (I created a border around my sweater fabric until it measured 6 ½” x 6 ½”)
Finished size: 19” x 29” (not including dowel rod pocket, with is 21” x 29”).

Instructions
Seam Allowance is ½" unless otherwise stated.
Layout
Find a large surface to lay-out your squares in the order you laid-out earlier on paper or the order that feels right for you. You will be working with three rows, so try to evenly distribute numbers in each row. Mine had 7 in rows one and two and 6 in row three, not including the pockets that were doubled up. The width of each square was adjusted once I had my ideal lay-out. (*Note: You will want to avoid cutting any of these pockets just yet, so you’ll have more surface to work with when embroidering or embellishing each pocket. You can use a water soluble pen to mark lines where you will be trimming them down). Here is what I did for my first row.

Once you have a layout for row 1, model rows two and three after those dimensions but mix things up a bit to keep it different and fun. I decided the last pocket was a big deal and made it slightly larger than any other at 7”x 7”. Which meant it would be its own pocket.

Deciding on a font or embellishment for each pocket.
I printed 0-9 in a number of my favorite fonts in different sizes from 20-120. This is where you can get creative. Some numbers I embroidered, some I used ribbon, felt or buttons to create. I even free handed a few. For those I embroidered, I used an embroidery transfer pen to trace and iron onto my fabric. I used a number of different stitches for these. Here are a few to highlight.
Number 11 and 14 I was really excited and proud of. I used a zig-zag stitch with a border (Letter H on the machine below) and made the stitches as wide as I could and pretty close together. I then wove through the zig zags to create a really dense and interesting texture. I used bakers twine in red and white to achieve the candy cane look in number 14. I’ll definitely be using this technique again.


Numbers 10, 21 and 24 were all cut out of felt and I hate using a pen or transfer pen for this because I can never 100% get it off. I used a different technique for these. I cut the numbers out of paper first and then glued them backwards onto the felt. I waited for the glue to dry, then cut the numbers out using the paper as my guide, then I peeled the paper off when I was done. I used the glue one more time to place the numbers on the squares and then stitched them on. (Used a fabric glue stick)

The last and biggest star was pretty self-explanatory, so I didn’t think it needed a number. I wanted it to be the most fancy though, so I used a reverse applique technique to put a nice bright gold star in the center. I layered the metallic fabric under my green fabric and stitched a star with the machine, going around the star twice. I then separated the layers and cut away the green from the center of the star, revealing the metallic gold fabric underneath.

*Note: This is by far the most time consuming, but creative part. So, take your time and have some fun with it. Once this is done, the rest goes together pretty quickly.
Sewing the pockets
Trim the squares that need to be cut down to the dimensions determined in step 1.
Hem or embellish with ribbon the pockets that will be in the FRONT of the doubled up pockets.
Sew numbers together in three strips, being careful to pin and stack evenly the doubled up pockets. Press seams open.
Layer your pocket backing pieces right sides together with your number rows. (Note: You will need to trim down the pocket backing for the third row as it will be shorter than the other two. And you may need to cut a pocket backing for the last pocket if it’s larger than the others) Sew along short sides and top, leaving bottom open. Turn to right side, press well and edge stitch along the top ONLY.

Determine the position for each row by laying them each out on the background fabric. Using a water soluble pen, mark the bottom position of each row.
Starting at the top, position the first row WRONG side facing you with the raw edges lined up with the markings you just made of the pocket bottom. Measure to make sure it’s straight, pin and sew along raw pocket edge at ½”.
Flip and press pocket up and edge stitch the two short ends to create one long pocket. Then stitch between each number to make several different pockets.
Repeat the last two steps with rows 2 and 3. Making sure to overlap rows by just about ½” to make sure they all fit.
Finishing touches
Fold dowel or yard stick pocket piece in half long ways and press. Finish each short end with a simple hem.
Baste stitch the dowel pocket onto the front of the calendar at ¼”, making sure to center it and line up raw edges at top.
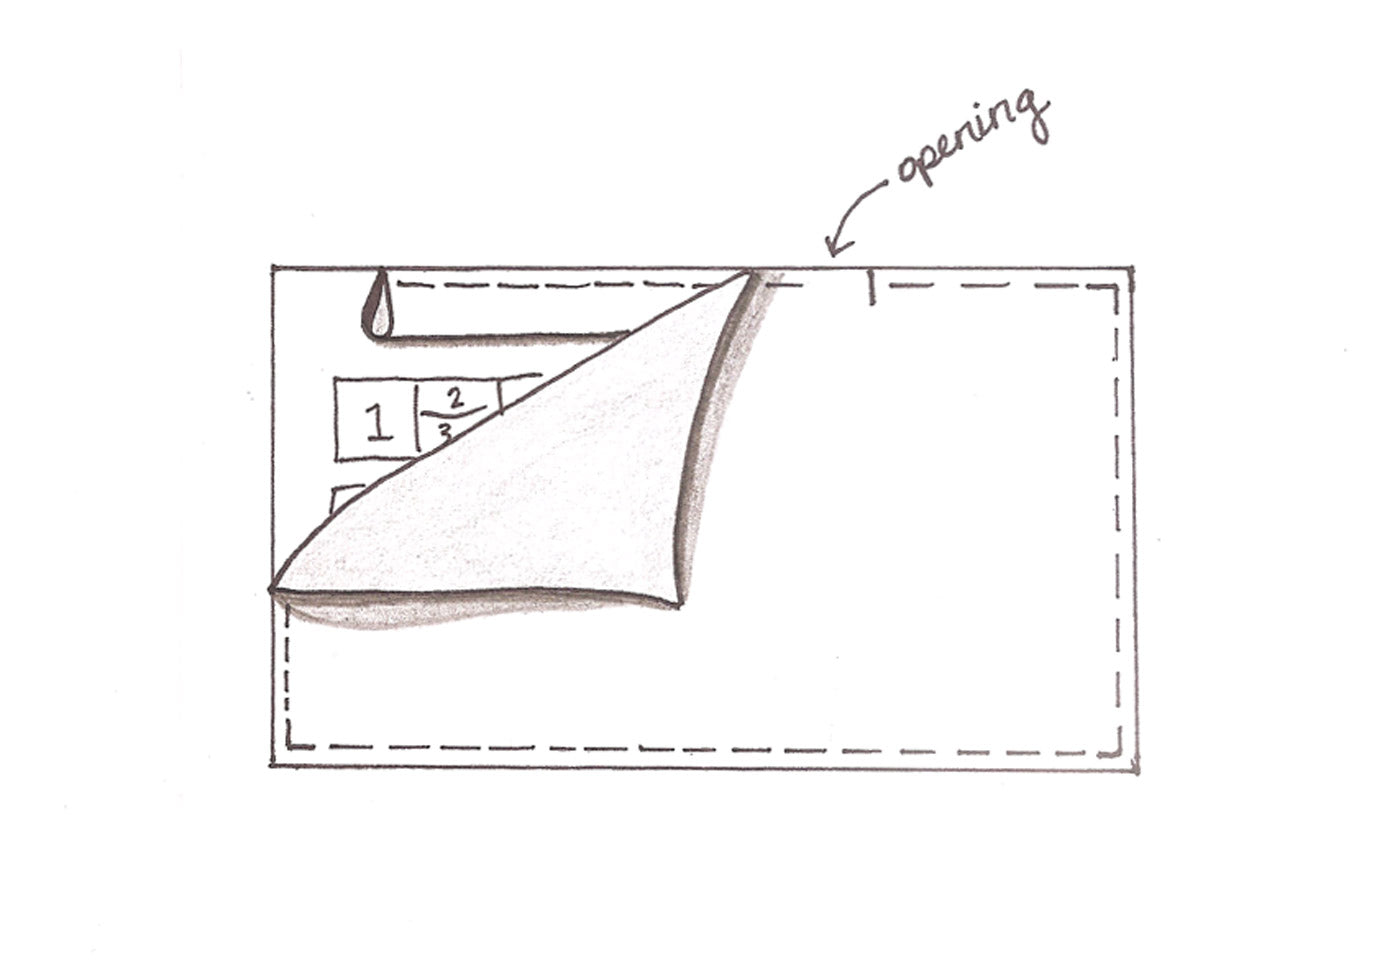
Lay backing canvas right sides together on top of calendar and sew all around leaving a 5” gap at the center top. Clip corners.
Turn calendar right sides out, press.
Sew a decorative or straight stitch along top of calendar between dowel pocket on calendar side and embellish with ribbon or trim if it doesn’t turn out pretty.
Feed dowel or yard stick through pocket and finish by tying a length of ribbon to either end for hanging.
I’m planning to fill these pockets with all kinds of fun, creative and silly surprises for my little toddler. What will be in yours?
To get some ideas for your own advent numbers take a look at what Tiffani did for each block!
1- Free-hand on machine, 2 - French knot, 3 - split stitch, 4 - backstitch, 5 - machine stitched felt, 6 - stem stitch, 7 - ribbon, 8 - buttons, 9 - heavy backstitch, 10 - blanket stitch around felt, 11 - woven thru zig-zag stitch with border, 12 - backstitch, 13 - backstitch, 14 - woven thru zig-zag stitch with border, 15 - chain stitch, 16 - split stitch, 17 - ribbon, 18 - backstitch with straight stitch detail, 19 - backstitch, 20 - backstitch, 21 - single stitch border on felt, 22 - split stitch, 23 - chain stitch, 24 - single stitch border on felt, 25 - reverse applique star with straight stitches and french knots around

Leave a comment